All our models are designed and manufactured to provide optimum performance. Nevertheless, operation and performance will depend to a great extent on how the units are installed.
General installation instructions
Although we describe the proper installation model for getting the best performance below, it is possible that it is not the most ideal model for you. Generally, it is always best for a professional to do the installation. If you decide to do your own installation, consult with a professional, keeping in mind that the installation of the unit must comply with all local regulations, including those referred to in national and European standards.
– The stove should be connected to a flue that assures sufficient draw for the unit.
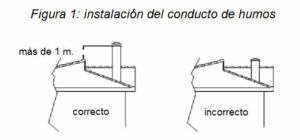
– The flue should be high enough – not less than 4m. high – and should exceed by at least one meter the highest point on the building and surroundings, including trees and other obstacles within a minimum 10m radius.
 – The diameter of the smoke outlet on the unit is the ideal size for creating a good draw. Avoid using smaller size stovepipe whenever possible.
– Do not connect various units to the same flue.
– It is advisable to locate the stovepipe inside the building. Install double wall stovepipe with insulation whenever the flue is located outside the building.
– For the fireplace or wood stove to have a proper draw, the room must have an air intake of at least enough flow to replace the volume of air flowing out through the flue. In well insulated homes that are hermetically sealed, it will be necessary to install an air intake from outside. Air inlet grilles should be installed so as to avoid blockage.
Warning.- In houses without an adequate air intake, extraction fans (such as kitchen smoke extractors) can cause problems by inverting the draw of the flues.
– If the stovepipe installation requires angles or elbows, avoid horizontal or descending sections. Keep in mind that the stovepipes will have to be cleaned. If necessary, install stovepipe with cleaning traps or openings at difficult-to-access sections.
-When metal stovepipe is installed inside a brick fireplace chimney, it should surpass the height of that chimney by some centimetres at the highest point.
– The stovepipe and chimney cap installation should be thoroughly watertight, avoiding the entry of water into the unit. Water is much more damaging to stoves than the high burning temperatures for which they are designed.
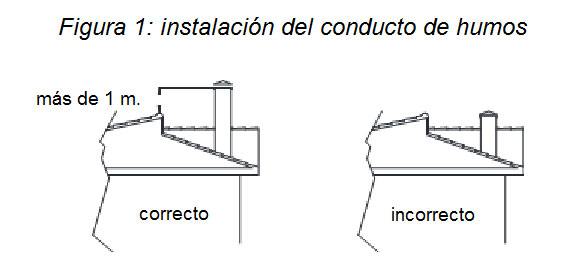
When the stovepipe is located inside the home, or within a brick chimney, the sections should be assembled in the direction shown in figure 1, in order to stop liquid caused by gas condensation from dripping outside the pipe through the joints. On the other hand, if some tube sections are outside of the building, they should be arranged in the direction shown in figure 2, to stop rainwater running down the tubes from entering at the joints.
– The diameter of the smoke outlet on the unit is the ideal size for creating a good draw. Avoid using smaller size stovepipe whenever possible.
– Do not connect various units to the same flue.
– It is advisable to locate the stovepipe inside the building. Install double wall stovepipe with insulation whenever the flue is located outside the building.
– For the fireplace or wood stove to have a proper draw, the room must have an air intake of at least enough flow to replace the volume of air flowing out through the flue. In well insulated homes that are hermetically sealed, it will be necessary to install an air intake from outside. Air inlet grilles should be installed so as to avoid blockage.
Warning.- In houses without an adequate air intake, extraction fans (such as kitchen smoke extractors) can cause problems by inverting the draw of the flues.
– If the stovepipe installation requires angles or elbows, avoid horizontal or descending sections. Keep in mind that the stovepipes will have to be cleaned. If necessary, install stovepipe with cleaning traps or openings at difficult-to-access sections.
-When metal stovepipe is installed inside a brick fireplace chimney, it should surpass the height of that chimney by some centimetres at the highest point.
– The stovepipe and chimney cap installation should be thoroughly watertight, avoiding the entry of water into the unit. Water is much more damaging to stoves than the high burning temperatures for which they are designed.
When the stovepipe is located inside the home, or within a brick chimney, the sections should be assembled in the direction shown in figure 1, in order to stop liquid caused by gas condensation from dripping outside the pipe through the joints. On the other hand, if some tube sections are outside of the building, they should be arranged in the direction shown in figure 2, to stop rainwater running down the tubes from entering at the joints.

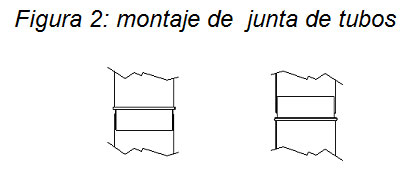
 1- Smoke exhaust pipe – Ø 200.
2- Fill the empty space between the interior chimney sides and the stovepipe with rock wool.
3- Optional fan-driven hot air outlet to other rooms.
4- Interior hood walls lined with rock wool.
5- Natural convection hot air outlet from the fireplace chamber.
6- Upper front fan-driven hot air outlet.
7- Cold air intake into the cassette convection chamber, absorbed by fans.
8- Cold air intake into the fireplace chamber by natural convection.
Masonry construction around the unit should allow for expansion during use. It should never directly rest on top of the unit, nor against its sides. Leave an expansion joint of at least 0.5 cm. on each side, and of at least 1 cm. above the top front.
1- Smoke exhaust pipe – Ø 200.
2- Fill the empty space between the interior chimney sides and the stovepipe with rock wool.
3- Optional fan-driven hot air outlet to other rooms.
4- Interior hood walls lined with rock wool.
5- Natural convection hot air outlet from the fireplace chamber.
6- Upper front fan-driven hot air outlet.
7- Cold air intake into the cassette convection chamber, absorbed by fans.
8- Cold air intake into the fireplace chamber by natural convection.
Masonry construction around the unit should allow for expansion during use. It should never directly rest on top of the unit, nor against its sides. Leave an expansion joint of at least 0.5 cm. on each side, and of at least 1 cm. above the top front.

 – The diameter of the smoke outlet on the unit is the ideal size for creating a good draw. Avoid using smaller size stovepipe whenever possible.
– Do not connect various units to the same flue.
– It is advisable to locate the stovepipe inside the building. Install double wall stovepipe with insulation whenever the flue is located outside the building.
– For the fireplace or wood stove to have a proper draw, the room must have an air intake of at least enough flow to replace the volume of air flowing out through the flue. In well insulated homes that are hermetically sealed, it will be necessary to install an air intake from outside. Air inlet grilles should be installed so as to avoid blockage.
Warning.- In houses without an adequate air intake, extraction fans (such as kitchen smoke extractors) can cause problems by inverting the draw of the flues.
– If the stovepipe installation requires angles or elbows, avoid horizontal or descending sections. Keep in mind that the stovepipes will have to be cleaned. If necessary, install stovepipe with cleaning traps or openings at difficult-to-access sections.
-When metal stovepipe is installed inside a brick fireplace chimney, it should surpass the height of that chimney by some centimetres at the highest point.
– The stovepipe and chimney cap installation should be thoroughly watertight, avoiding the entry of water into the unit. Water is much more damaging to stoves than the high burning temperatures for which they are designed.
When the stovepipe is located inside the home, or within a brick chimney, the sections should be assembled in the direction shown in figure 1, in order to stop liquid caused by gas condensation from dripping outside the pipe through the joints. On the other hand, if some tube sections are outside of the building, they should be arranged in the direction shown in figure 2, to stop rainwater running down the tubes from entering at the joints.
– The diameter of the smoke outlet on the unit is the ideal size for creating a good draw. Avoid using smaller size stovepipe whenever possible.
– Do not connect various units to the same flue.
– It is advisable to locate the stovepipe inside the building. Install double wall stovepipe with insulation whenever the flue is located outside the building.
– For the fireplace or wood stove to have a proper draw, the room must have an air intake of at least enough flow to replace the volume of air flowing out through the flue. In well insulated homes that are hermetically sealed, it will be necessary to install an air intake from outside. Air inlet grilles should be installed so as to avoid blockage.
Warning.- In houses without an adequate air intake, extraction fans (such as kitchen smoke extractors) can cause problems by inverting the draw of the flues.
– If the stovepipe installation requires angles or elbows, avoid horizontal or descending sections. Keep in mind that the stovepipes will have to be cleaned. If necessary, install stovepipe with cleaning traps or openings at difficult-to-access sections.
-When metal stovepipe is installed inside a brick fireplace chimney, it should surpass the height of that chimney by some centimetres at the highest point.
– The stovepipe and chimney cap installation should be thoroughly watertight, avoiding the entry of water into the unit. Water is much more damaging to stoves than the high burning temperatures for which they are designed.
When the stovepipe is located inside the home, or within a brick chimney, the sections should be assembled in the direction shown in figure 1, in order to stop liquid caused by gas condensation from dripping outside the pipe through the joints. On the other hand, if some tube sections are outside of the building, they should be arranged in the direction shown in figure 2, to stop rainwater running down the tubes from entering at the joints.
 1- Smoke exhaust pipe – Ø 200.
2- Fill the empty space between the interior chimney sides and the stovepipe with rock wool.
3- Optional fan-driven hot air outlet to other rooms.
4- Interior hood walls lined with rock wool.
5- Natural convection hot air outlet from the fireplace chamber.
6- Upper front fan-driven hot air outlet.
7- Cold air intake into the cassette convection chamber, absorbed by fans.
8- Cold air intake into the fireplace chamber by natural convection.
Masonry construction around the unit should allow for expansion during use. It should never directly rest on top of the unit, nor against its sides. Leave an expansion joint of at least 0.5 cm. on each side, and of at least 1 cm. above the top front.
1- Smoke exhaust pipe – Ø 200.
2- Fill the empty space between the interior chimney sides and the stovepipe with rock wool.
3- Optional fan-driven hot air outlet to other rooms.
4- Interior hood walls lined with rock wool.
5- Natural convection hot air outlet from the fireplace chamber.
6- Upper front fan-driven hot air outlet.
7- Cold air intake into the cassette convection chamber, absorbed by fans.
8- Cold air intake into the fireplace chamber by natural convection.
Masonry construction around the unit should allow for expansion during use. It should never directly rest on top of the unit, nor against its sides. Leave an expansion joint of at least 0.5 cm. on each side, and of at least 1 cm. above the top front.
